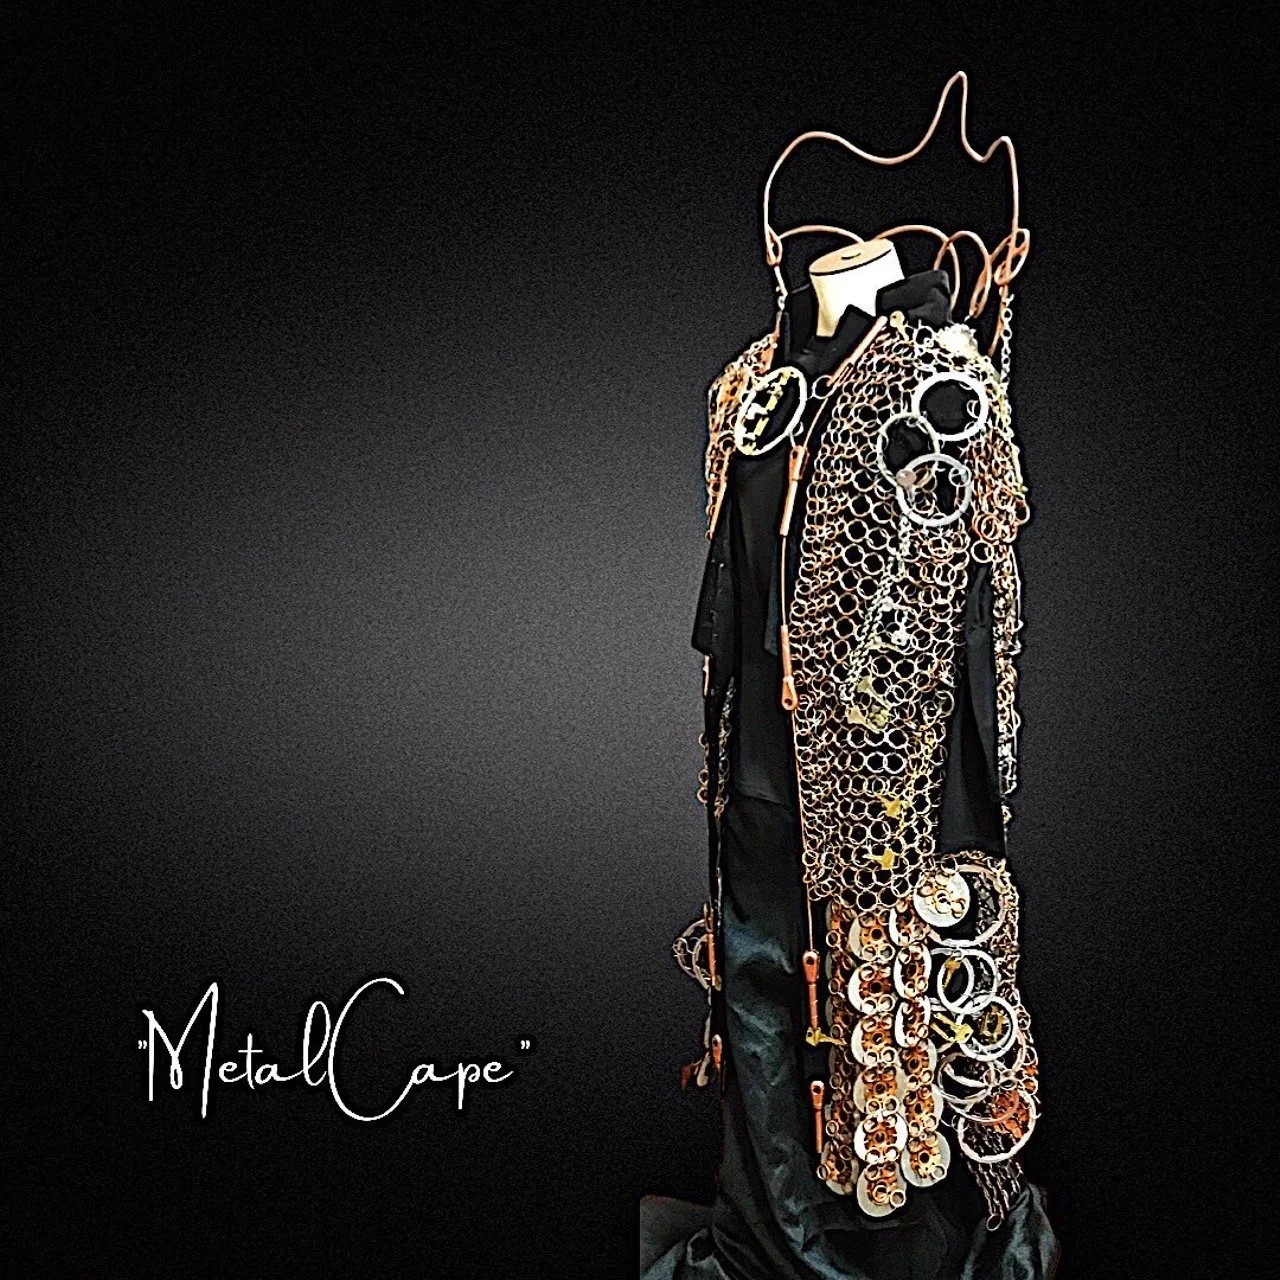
Wearable Art Part II: Metal Cape
Last August I got an email about a call for submissions to the Saskatchewan Fashion Weekend Jack Millikin Centre & Wiebe Works Wearable Art Show & Gala. I decided to enter two pieces into this show: a Metal Cape and an Embellished Jean Jacket. After creating some rough sketches, I began making some Instagram-inspired keys for my Metal Cape. It took about three months to complete the cape (working around my fulltime job - lots of weekend, evening, early morning, and lunch time hours as well as some August holidays to get me started).


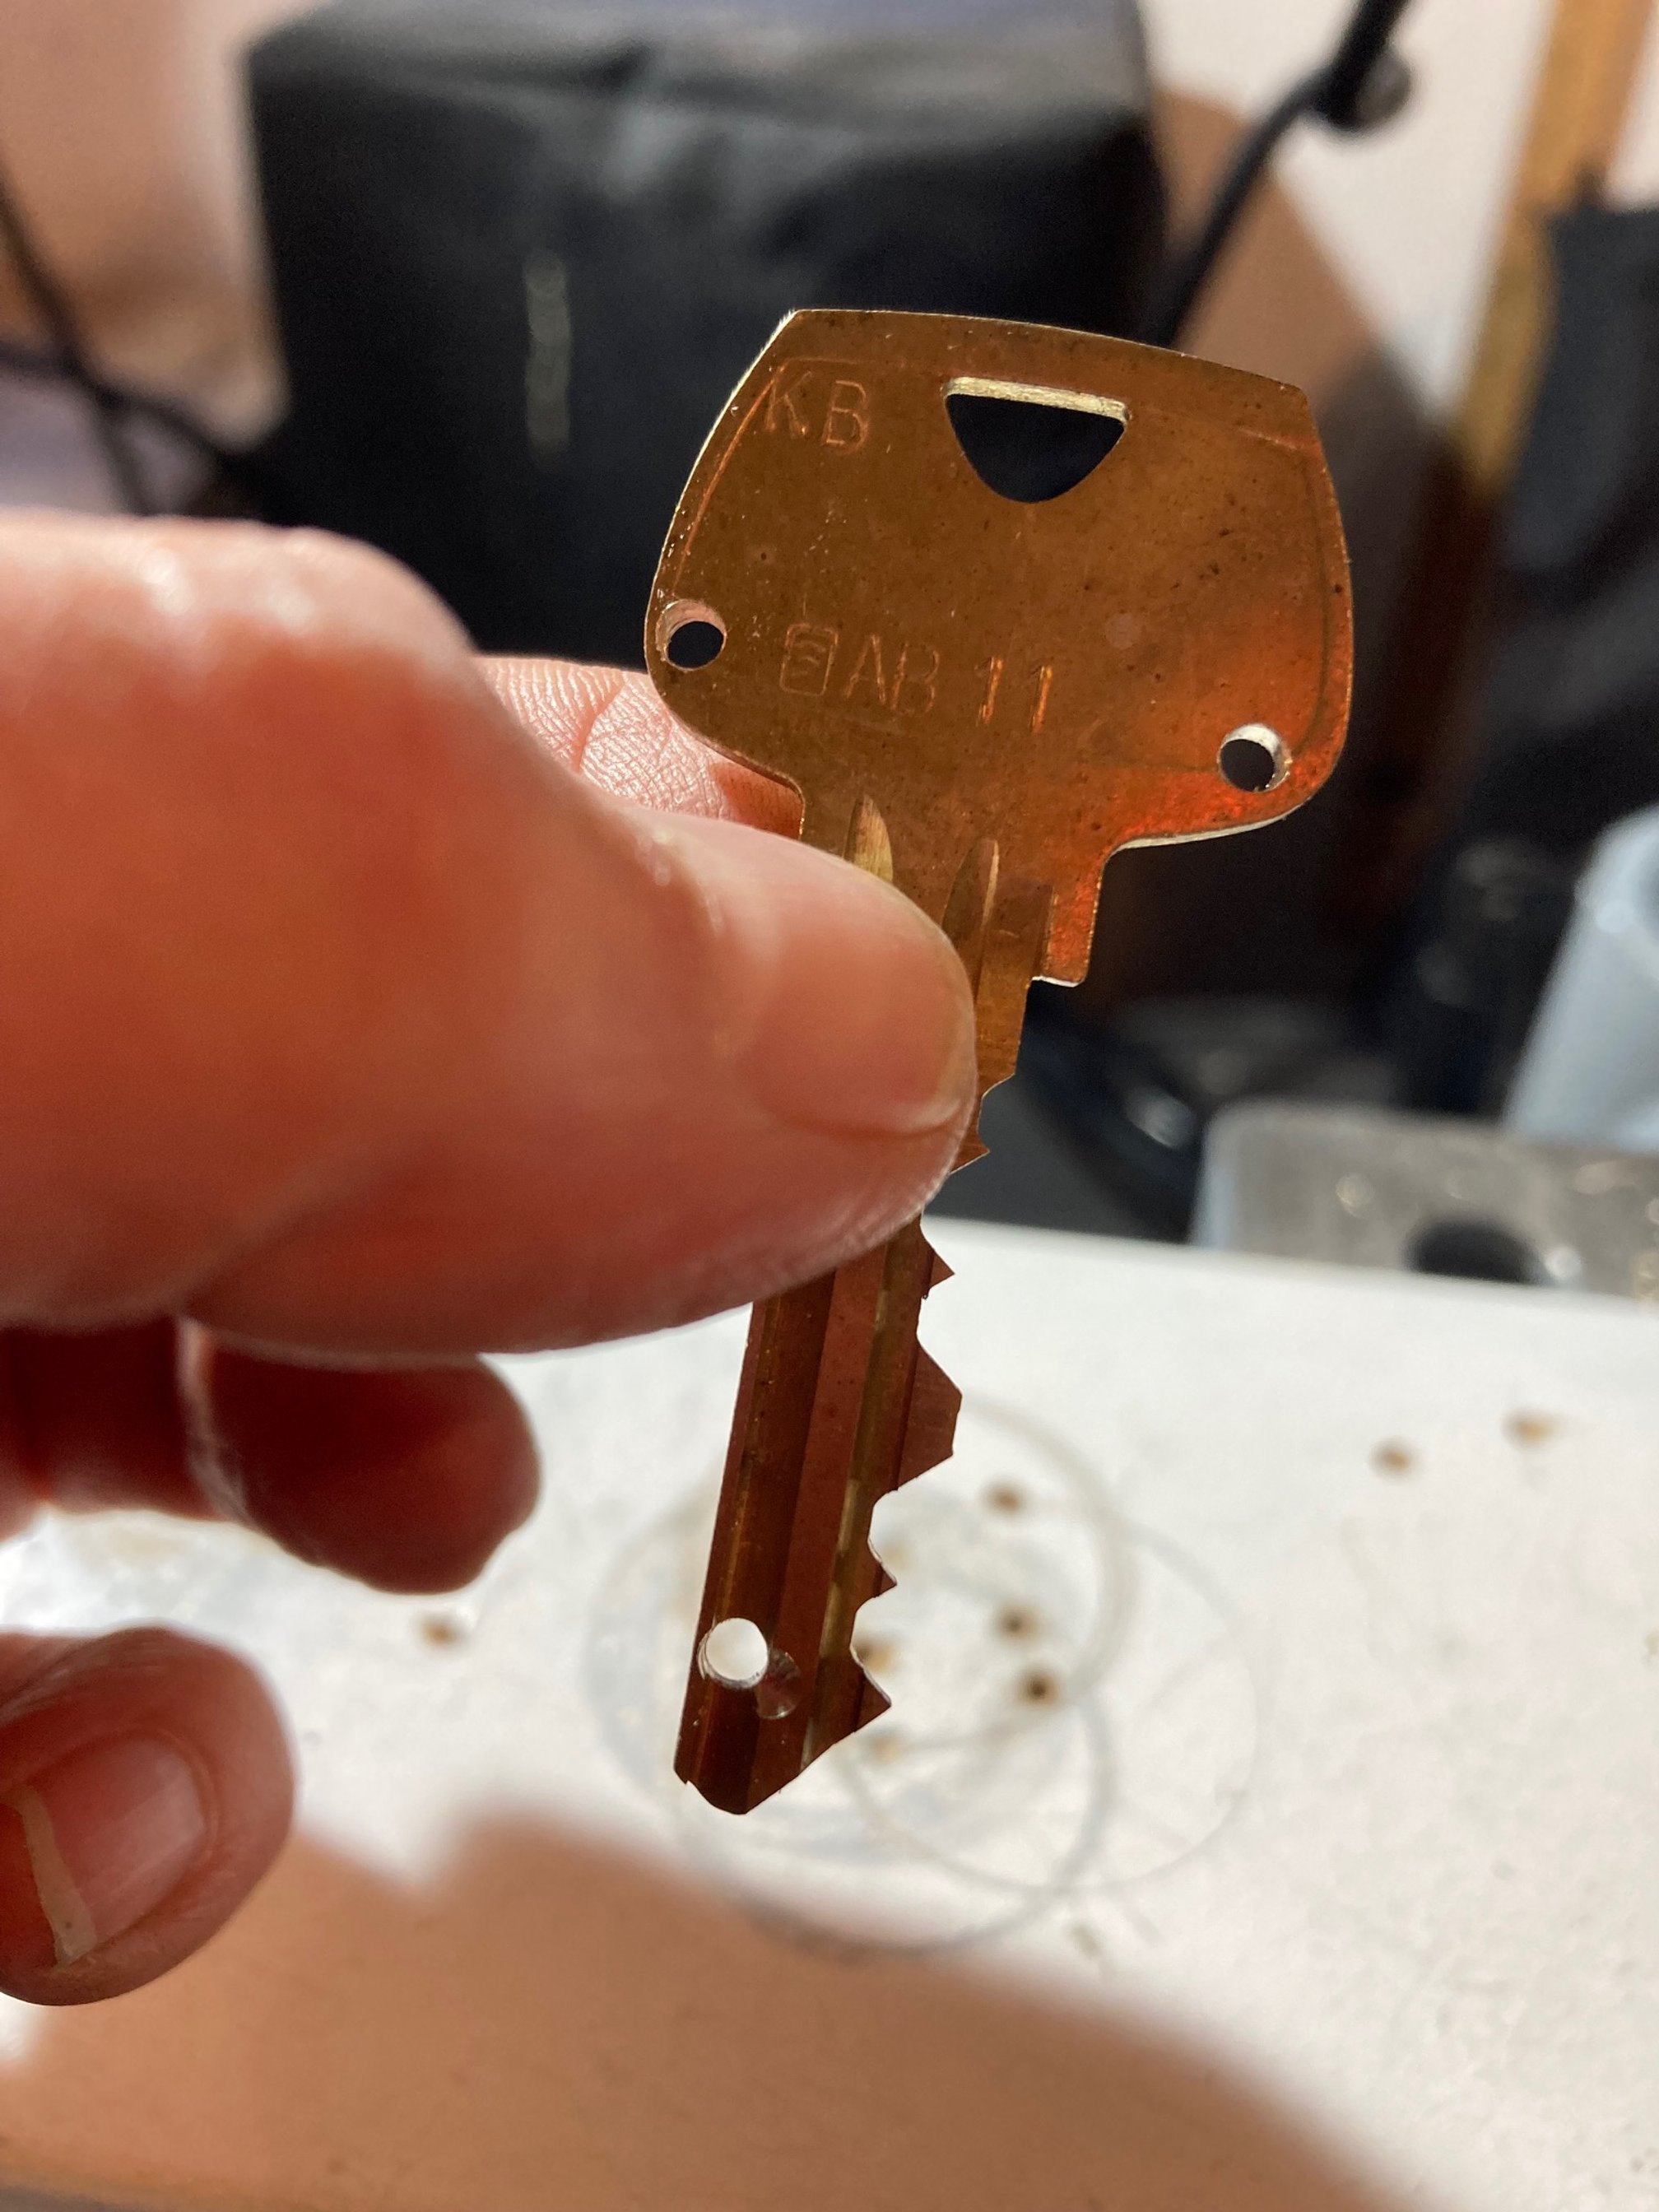
I have an abundance of office keys that were gifted to me from a coworker that I decided to incorporate into the Metal Cape. I began this project by sorting them out. I also had a look at some of the various metal bits that were lurking in the garage and my studio space and started forming them into “keys”.

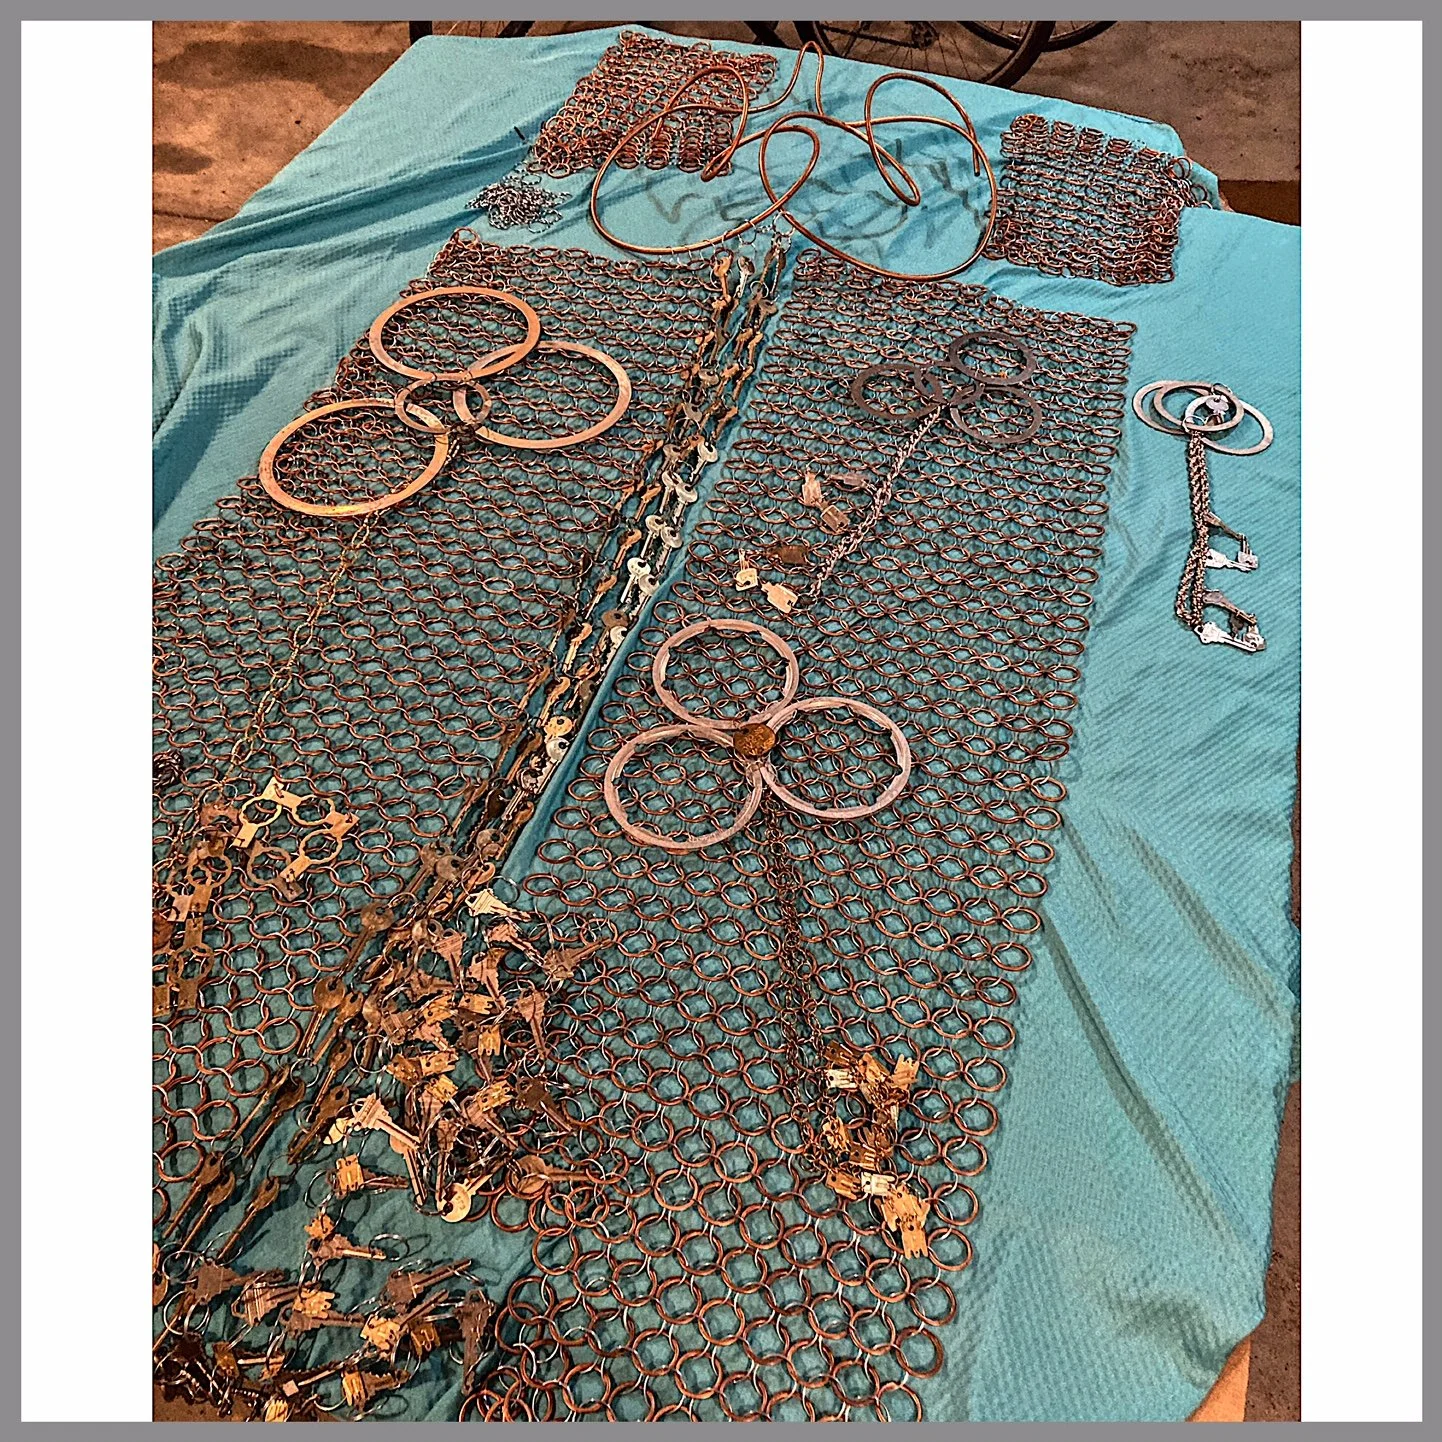
Very early in the process I thought I could make a large key on the back of the cape and create a fancy collar for the top of the key. I had some copper tubing that I bent into a collar/key-top shape. Next, I began laying out the copper rings, piano wire, and some keys to see what kind of cape I could make and how far those rings would stretch. It was around this point that I decided to order some split or give-away key rings to make the rings into a type of chain mail (I didn’t have enough). I did try and get the key rings locally, but it was faster and cheaper to order them myself (which is what the key shop would have done).


After dealing with the weather a few times, I made a make-shift table in the garage out of two sawhorses and the large cardboard box my desk came in and moved everything inside. I didn’t know anything about making chain mail and initially just looped the rings together in lines.


Luckily for me my chain mail making friend stopped by and suggested a chain mail pattern to try. So, with her expert advice, the arrival of two large packages of give-away key rings, and the help of YouTube I was on my chain mail way!

Unfortunately for me my fingernails weren’t quite up to the split key-ring chain mail task and kept ripping off until I ran out of fingers to use. I tried a few tools and ideas before settling onto a makeshift fingernail that I made out of the back of a clip-on earring and a Band-Aid. This really worked well and eventually I got into a great chain mail making rhythm.


I had been using a drill to make holes into the office keys that were incorporated into the cape. This was ok for the first few sets of keys I drilled but pretty impossible when I decided to add brass keys. I kept thinking that a drill press would likely work well (even though it has been about 40 years since I was near one). I was overjoyed to discover that I could get a small bench drill press! Happy was the day when it arrived. Once I got over my fear that I wouldn’t be able to figure it out I set it up. It works so well and opens up an abundance of future key-making possibilities.


Next, I laid out the completed chain mail panels and then figured out where I’d put the metal keys I’d made earlier. It got a bit tricky sometimes taking out chain mail links to add in the keys. For some of the bigger keys I ended up filling in their metal rings with another material to give the cape more stability.
I tried on the cape a few times to see how it was working. Not bad, not bad…a lot of weight at the back of the cape that I thought I could balance out with some more weight at the front. Also, I wasn’t sure how I would get the collar to stay up…

I thought it needed a more interesting shape, so I added an insert of large rings at the side of the cape along the bottom. Even though the chain mail itself is very light, the keys are heavy, and the cape started pulling apart on itself. I noticed this about a week before the fittings…a somewhat anxious time!

Off to Value Village I went to solve my metal cape weight problem. I found a sleeveless khaki jean dress that I thought I could maybe cover with black cloth and use as a base for the cape. I was on my way to buy it when I spotted a black cotton vest. The vest is a beautiful rich black colour that looks like velvet even though it’s cotton. I don’t actually know what context a person would wear it in. but it was perfect, perfect, perfect for my weight bearing quest. I also went to the fabric store and bought some heavy-duty straps that I sewed into the vest for added support.

I posted a picture of my “sewing chain mail onto a vest because it’s too heavy” task and, luckily for me, a dance mom friend spotted it and gave me the very wise advice to use dental floss or fishing line instead of thread and not worry about what the inside of the piece looks like. I decided to go with fishing line as it is less visible than dental floss. This was a great choice, and I am so glad I posted about the thread!

In order to make the sewing go more smoothly, I ran a pole through the sleeves of the cape and slowly raised it as I sewed the chain mail on. The table held much of the weight of the cape, and it was great to be able to work on both sides easily.


The cape was still pretty heavy at the back but much easier to wear and no longer pulling apart on itself.


After many evening and weekend hours I managed to finish the cape enough to be ready for fittings. I was very, very lucky to have model Kathy Bond from Masala Model and Talent wear the Metal Cape. Kathy is an absolutely brilliant model, and no doubt was a major contributor to the success of this wearable art project. Paula Collins from Masala generously held the collar up so I could mark the location of it on the cape with blue tape. The fittings went smoothly; it was a fun day of meeting other artists and getting ready for the gala. I did crash pretty hard when the fittings were done and remember vividly the feeling of the stress coming off me later that day.


At the fitting I decided that the cape needed a bit of something at the front and when I got home I made this medallion with some guitar pieces that were recently gifted to me. The small key on the medallion was a gift from colleagues who found it at their workplace and generously thought of me.

I also thought the front of the cape needed more work and added in some fancy (and light weight) medallions. To me this really made difference and really finished the piece off. The finished cape, in case you are wondering, is 28 pounds. Model Kathy is a trained dancer and Pilates instructor and was able to move in the cape with ease (and she didn’t wear it longer than needed).
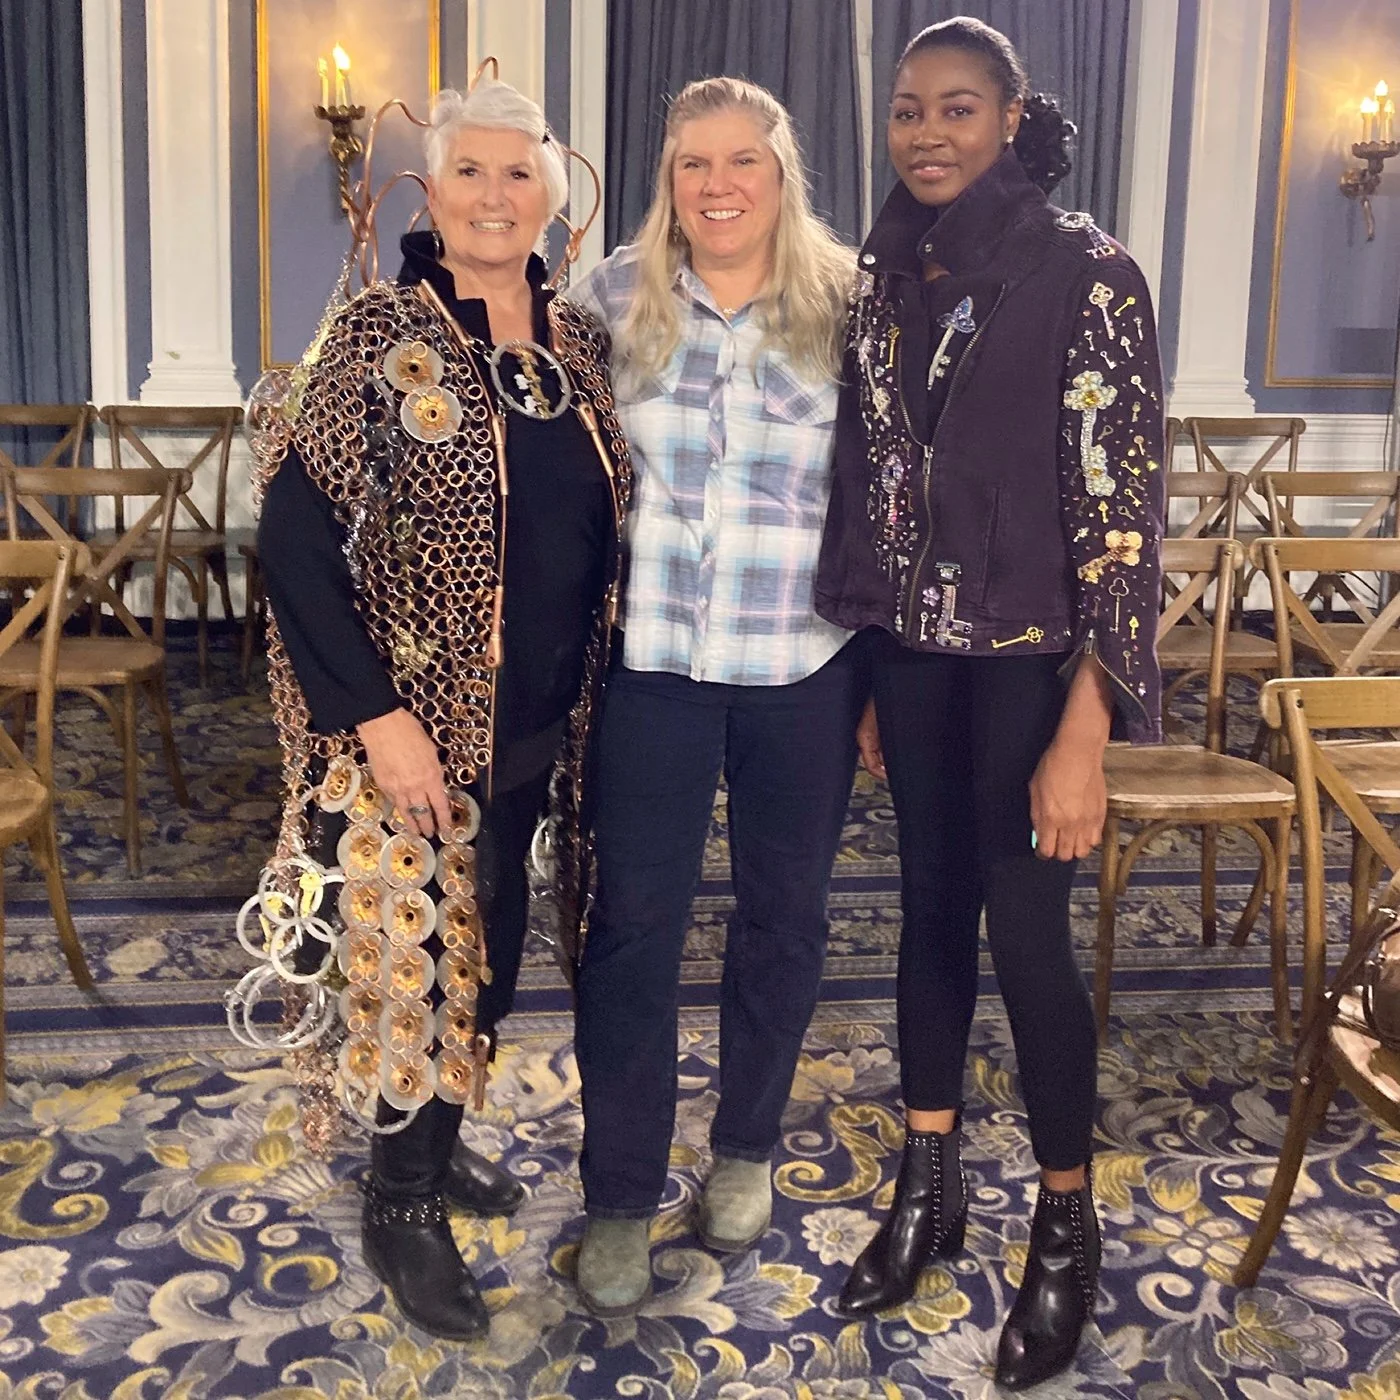
Here are models Kathy Bond and Sameiratou Osehni wearing my wearable art pieces on the rehearsal day.

I was so happy with how everything turned out that when I asked my friend to take my picture with the models, I thought I would start crying. Truly it was a great experience!
Here is a video of the Metal Cape in rehearsal; although the model didn’t have hair and makeup done on this day the cape was likely at its best in this video - the collar was at a perfect angle and all the other little bits and pieces were in the correct place.
Best in show artist Alexa Hainsworth sent me this beautiful shot of Kathy on the runway. Kathy’s makeup was created by Jennilee Cardinal-Schultz @greentreebeauty and her hair was by @revampyxe Pamela Parker @misspamparkerstyles. It’s not in this shot but the visual art on the screen was “There is a Pattern in Everything” by Valerie Wiebe.
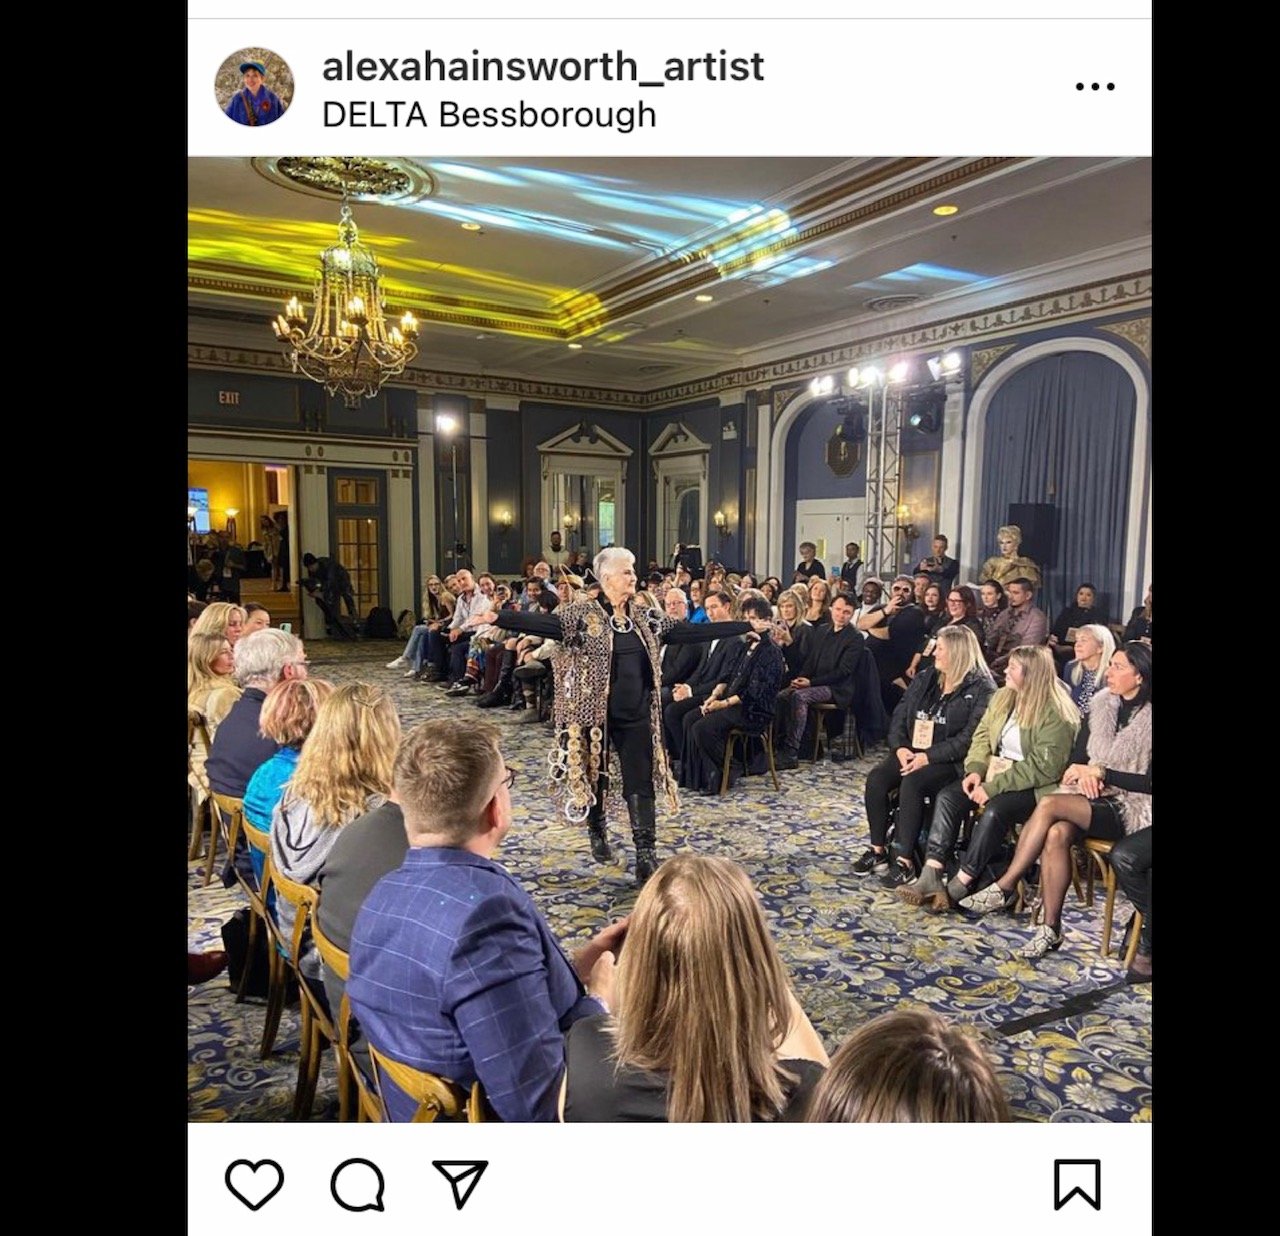
The Metal Cape was selected as First Place prize winner in the Open Category of the SK Fashion 2022 Wearable Art Gala.

I am so grateful for the generosity of others that contributed to the Metal Cape, the opportunity to take part in the Wearable Art Gala, all the luck and learning I had through the creation process, the wonderful support from my friends and my husband, and, perhaps best of all, being able to wear an artist nametag and really feeling (like, really feeling, after many years of many projects) that I deserve to be called an artist.

